
只需要一个域名,就可以创建多个不同的邮箱,类似各大邮箱平台 QQ邮箱,谷歌邮箱等,本项目使用Cloud flare部署,Rsend推送邮件,无需服务器费用,搭建属于自己的邮箱服务
![[开源邮箱] Cloudflare 邮箱服务 使用Vue3开发的响应式简约邮箱服务,支持邮件发送附件收发](https://www.4mf.net/wp-content/uploads/2025/07/20250714141429332241.png)
![[开源邮箱] Cloudflare 邮箱服务 使用Vue3开发的响应式简约邮箱服务,支持邮件发送附件收发](https://www.4mf.top/wp-content/themes/justnews/themer/assets/images/lazy.png)
项目地址
eoao/cloud-mail: cloudflare email 邮箱 临时邮箱 邮件发送 mail
部署教程
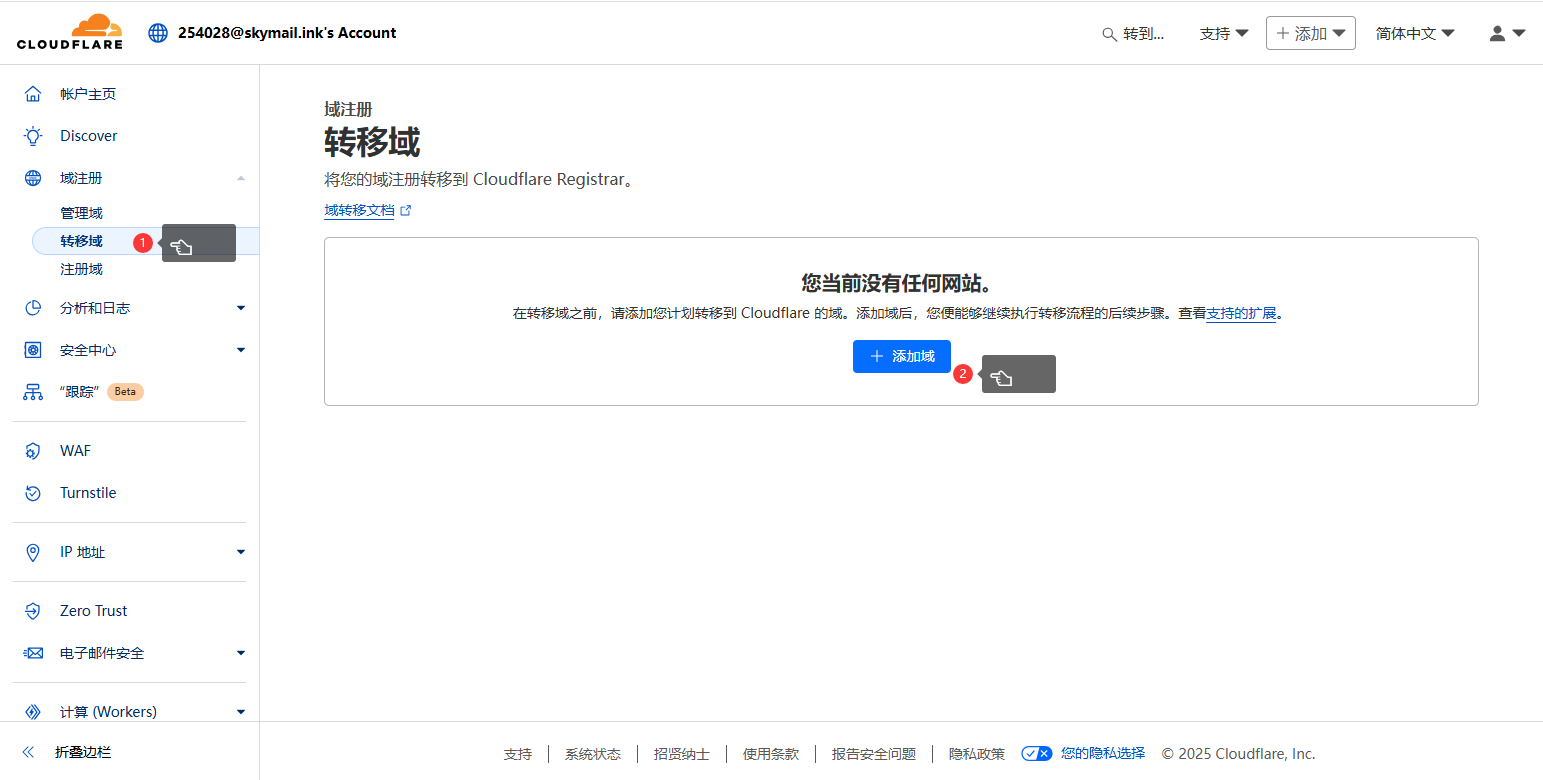
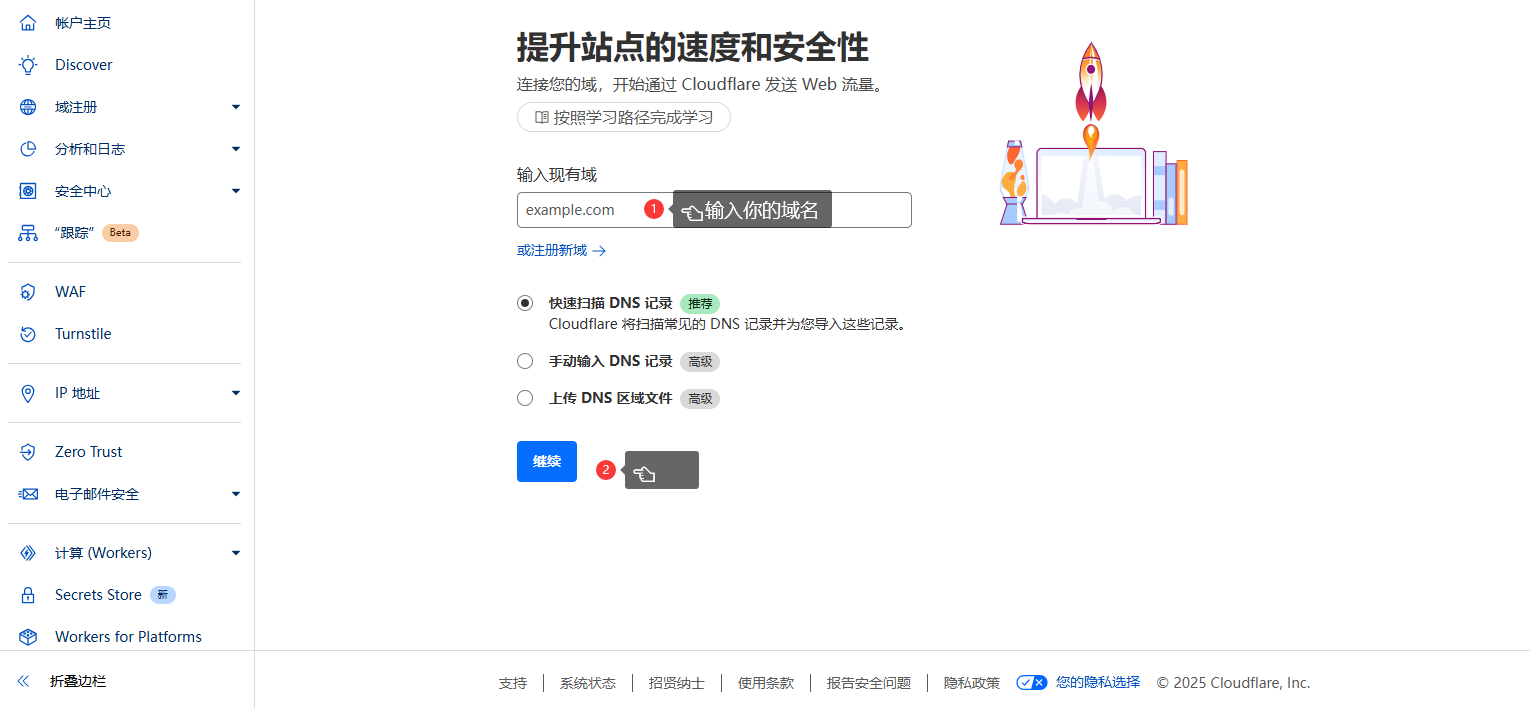
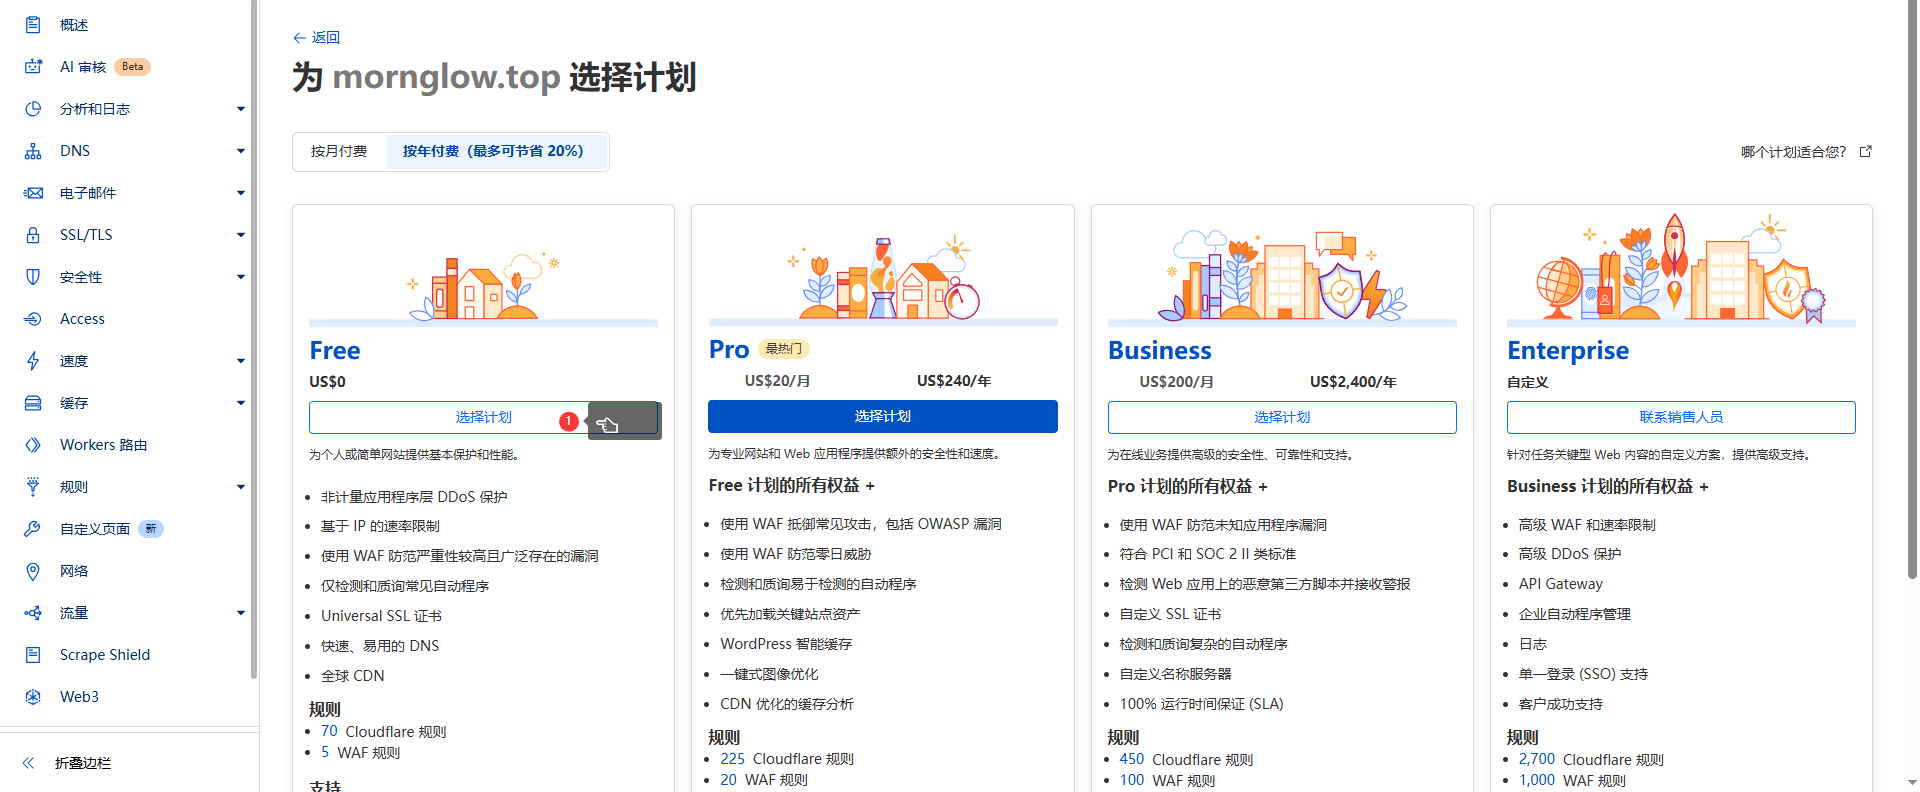
1 绑定域名
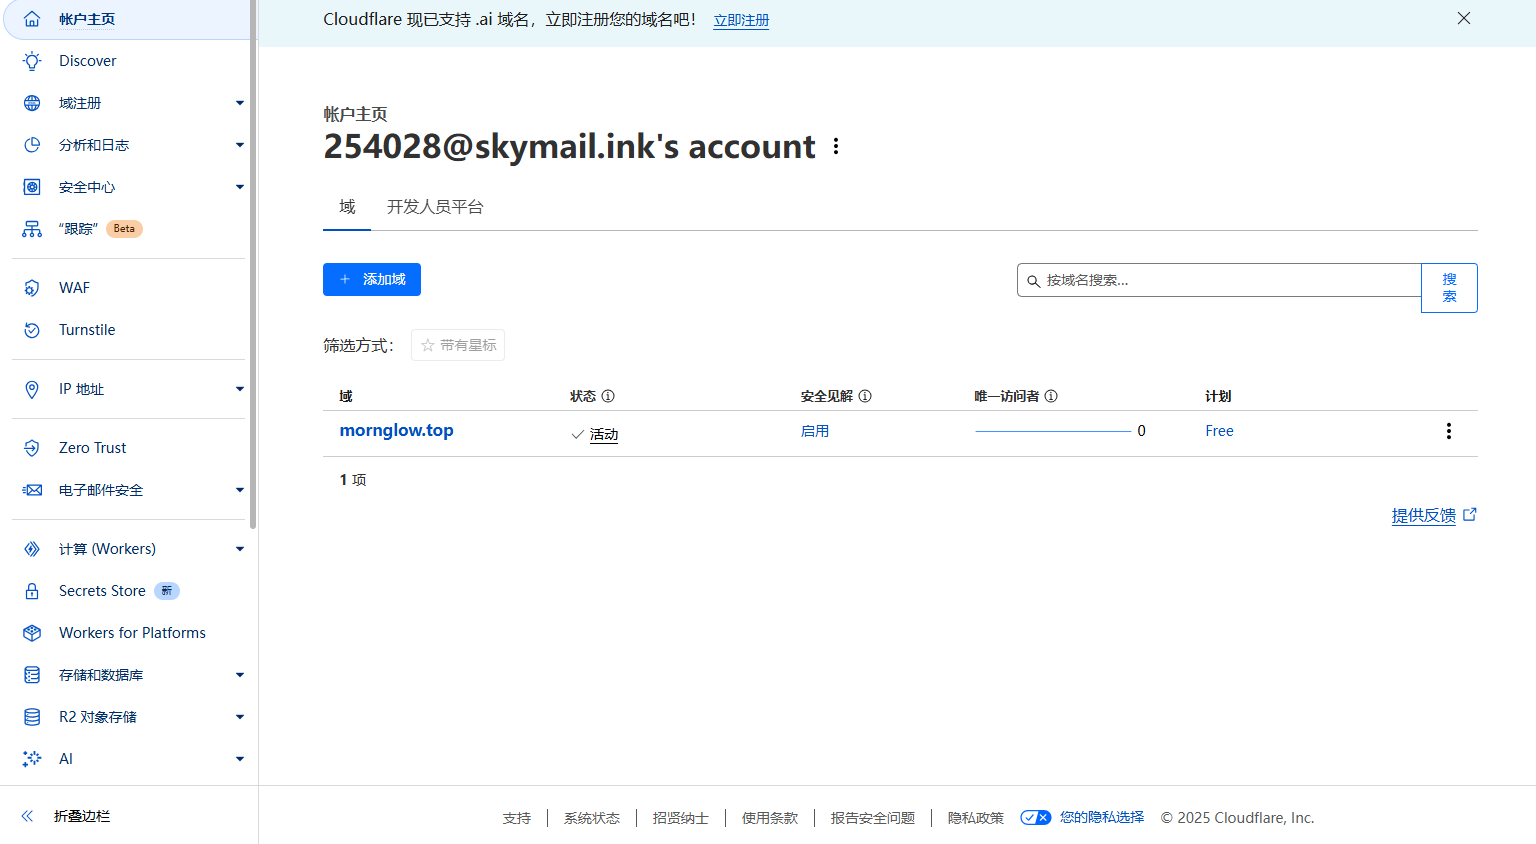
注册账号登录到cloudflare 控制台,开始绑定域名(如果你已经绑定好了可以直接跳到第二步)
![[开源邮箱] Cloudflare 邮箱服务 使用Vue3开发的响应式简约邮箱服务,支持邮件发送附件收发](https://blog.skymail.ink/images/getting-started/4.png)
设置dns
![[开源邮箱] Cloudflare 邮箱服务 使用Vue3开发的响应式简约邮箱服务,支持邮件发送附件收发](https://blog.skymail.ink/images/getting-started/5.png)
不同的厂商的修改dns都差不多,这里以华为云为例
![[开源邮箱] Cloudflare 邮箱服务 使用Vue3开发的响应式简约邮箱服务,支持邮件发送附件收发](https://blog.skymail.ink/images/getting-started/6.png)
设置完成后可能要等几分钟,期间可以刷新浏览器看有没有完成
![[开源邮箱] Cloudflare 邮箱服务 使用Vue3开发的响应式简约邮箱服务,支持邮件发送附件收发](https://blog.skymail.ink/images/getting-started/7.png)
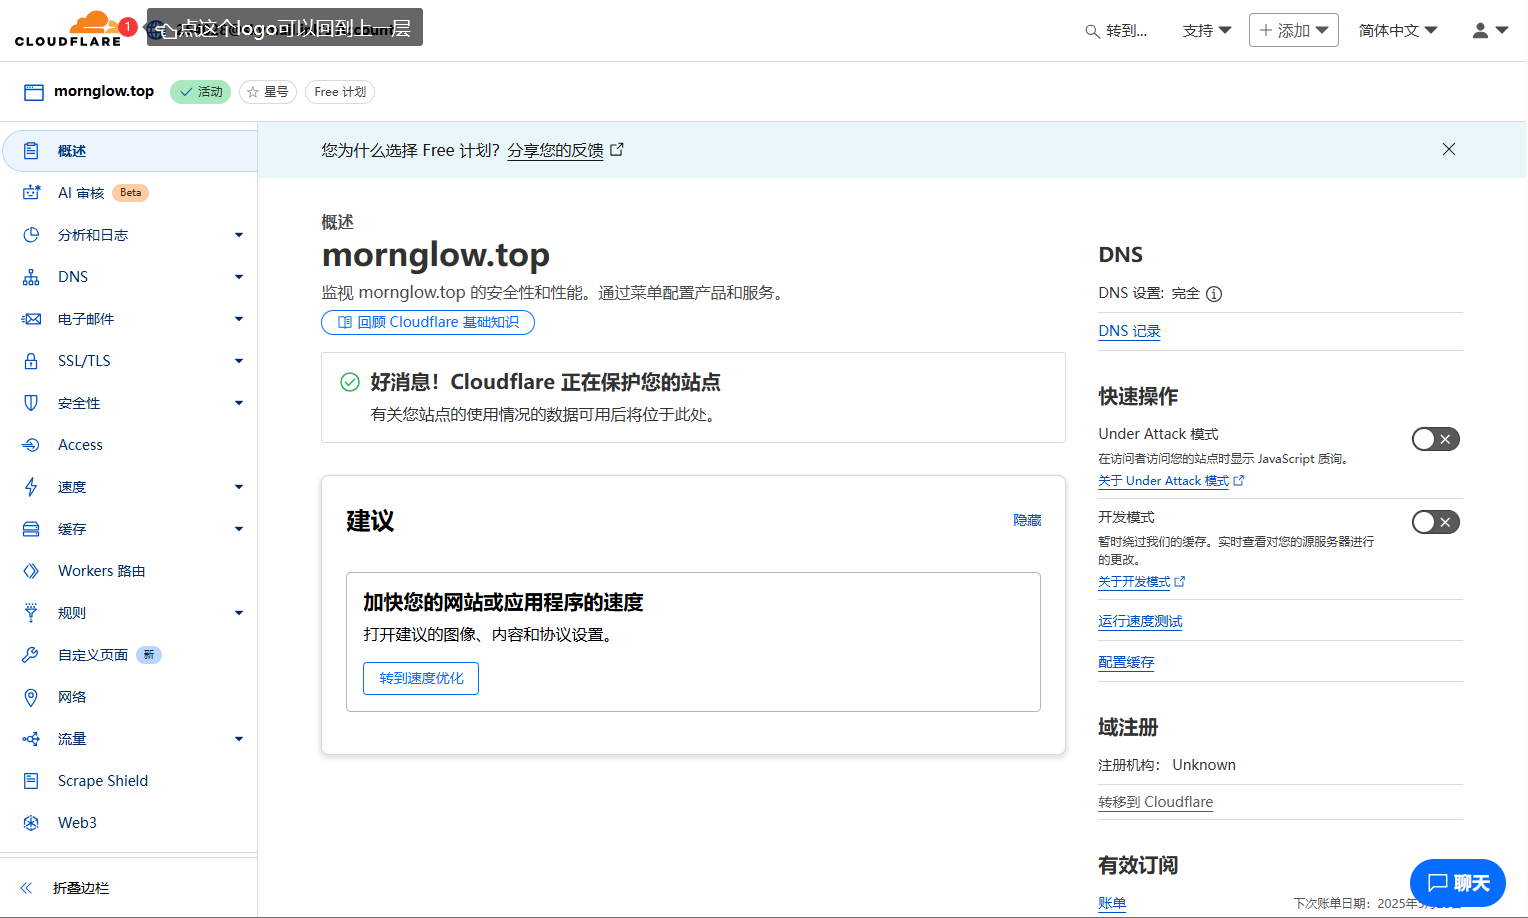
2 创建worker项目
到项目仓库fork项目代码到你的仓库
![[开源邮箱] Cloudflare 邮箱服务 使用Vue3开发的响应式简约邮箱服务,支持邮件发送附件收发](https://blog.skymail.ink/images/getting-started/10.png)
![[开源邮箱] Cloudflare 邮箱服务 使用Vue3开发的响应式简约邮箱服务,支持邮件发送附件收发](https://blog.skymail.ink/images/getting-started/11.png)
这样子仓库就会复制到你那边了
![[开源邮箱] Cloudflare 邮箱服务 使用Vue3开发的响应式简约邮箱服务,支持邮件发送附件收发](https://blog.skymail.ink/images/getting-started/12.png)
回到cloudflare控制台,找到workers页面导入你的github仓库代码
![[开源邮箱] Cloudflare 邮箱服务 使用Vue3开发的响应式简约邮箱服务,支持邮件发送附件收发](https://blog.skymail.ink/images/getting-started/13.png)
![[开源邮箱] Cloudflare 邮箱服务 使用Vue3开发的响应式简约邮箱服务,支持邮件发送附件收发](https://blog.skymail.ink/images/getting-started/14.png)
![[开源邮箱] Cloudflare 邮箱服务 使用Vue3开发的响应式简约邮箱服务,支持邮件发送附件收发](https://blog.skymail.ink/images/getting-started/15.png)
设置启动目录
![[开源邮箱] Cloudflare 邮箱服务 使用Vue3开发的响应式简约邮箱服务,支持邮件发送附件收发](https://blog.skymail.ink/images/getting-started/16.png)
等待构建部署完成
![[开源邮箱] Cloudflare 邮箱服务 使用Vue3开发的响应式简约邮箱服务,支持邮件发送附件收发](https://blog.skymail.ink/images/getting-started/17.png)
构建完成后的页面
![[开源邮箱] Cloudflare 邮箱服务 使用Vue3开发的响应式简约邮箱服务,支持邮件发送附件收发](https://blog.skymail.ink/images/getting-started/18.png)
这时候项目就会出现在worker列表了,点击名字进入可以查看和设置
![[开源邮箱] Cloudflare 邮箱服务 使用Vue3开发的响应式简约邮箱服务,支持邮件发送附件收发](https://blog.skymail.ink/images/getting-started/19.png)
3 设置环境变量
服务还需要设置一些环境变量和绑定数据库才能正常运行
![[开源邮箱] Cloudflare 邮箱服务 使用Vue3开发的响应式简约邮箱服务,支持邮件发送附件收发](https://blog.skymail.ink/images/getting-started/20.png)
添加以下变量,注意domain是json类型的
| 变量名 | 值 | 类型 | 作用 |
|---|---|---|---|
| domain | ["你的域名"], 示例:["mornglow.top"] | JSON | 网站会使用这个域名作为邮箱域名 |
| admin | 管理员的邮箱,示例:admin@mornglow.top | 纯文本 | 该邮箱用户注册后会成为网站管理员 |
| jwt_secret | 随便输入一串字符串,示例:Z7f!xPq8mV@L2bC$r9X&N1t | 纯文本 | 登录身份令牌的安全密钥 |
![[开源邮箱] Cloudflare 邮箱服务 使用Vue3开发的响应式简约邮箱服务,支持邮件发送附件收发](https://blog.skymail.ink/images/getting-started/21.png)
设置完成自定义域名和环境变量的样子
![[开源邮箱] Cloudflare 邮箱服务 使用Vue3开发的响应式简约邮箱服务,支持邮件发送附件收发](https://blog.skymail.ink/images/getting-started/22.png)
4 绑定数据库
找到左侧菜单存储和数据库,创建kv数据库,数据库名字随意
![[开源邮箱] Cloudflare 邮箱服务 使用Vue3开发的响应式简约邮箱服务,支持邮件发送附件收发](https://blog.skymail.ink/images/getting-started/23.png)
创建d1数据库,数据库名字随意 位置选择离你近的地方
![[开源邮箱] Cloudflare 邮箱服务 使用Vue3开发的响应式简约邮箱服务,支持邮件发送附件收发](https://blog.skymail.ink/images/getting-started/24.png)
回到worker设置界面绑定刚刚创建的数据库
d1数据库 变量名为 db
kv数据库 变量名为 kv
![[开源邮箱] Cloudflare 邮箱服务 使用Vue3开发的响应式简约邮箱服务,支持邮件发送附件收发](https://blog.skymail.ink/images/getting-started/25.png)
浏览器输入https://你的自定义域名/api/init/你绑定的的jwt_secret 会自动初始化数据库(如果之前部署过只会更新不会覆盖原有数据)
![[开源邮箱] Cloudflare 邮箱服务 使用Vue3开发的响应式简约邮箱服务,支持邮件发送附件收发](https://blog.skymail.ink/images/getting-started/28-2.png)
浏览器输入你绑定的自定义域名网站已经能打开了,注册登录了
![[开源邮箱] Cloudflare 邮箱服务 使用Vue3开发的响应式简约邮箱服务,支持邮件发送附件收发](https://blog.skymail.ink/images/getting-started/29.png)
5 启用邮件接收
设置完成后才能接收邮件了
回到cloudflare控制台,点击菜单账户主页,再点你的域名
![[开源邮箱] Cloudflare 邮箱服务 使用Vue3开发的响应式简约邮箱服务,支持邮件发送附件收发](https://blog.skymail.ink/images/getting-started/30.png)
菜单栏会发生变化
![[开源邮箱] Cloudflare 邮箱服务 使用Vue3开发的响应式简约邮箱服务,支持邮件发送附件收发](https://blog.skymail.ink/images/getting-started/31.png)
![[开源邮箱] Cloudflare 邮箱服务 使用Vue3开发的响应式简约邮箱服务,支持邮件发送附件收发](https://blog.skymail.ink/images/getting-started/32.png)
![[开源邮箱] Cloudflare 邮箱服务 使用Vue3开发的响应式简约邮箱服务,支持邮件发送附件收发](https://blog.skymail.ink/images/getting-started/33.png)
启用电子邮件
![[开源邮箱] Cloudflare 邮箱服务 使用Vue3开发的响应式简约邮箱服务,支持邮件发送附件收发](https://blog.skymail.ink/images/getting-started/34.png)
![[开源邮箱] Cloudflare 邮箱服务 使用Vue3开发的响应式简约邮箱服务,支持邮件发送附件收发](https://blog.skymail.ink/images/getting-started/35.png)
启用电子邮件完成后的样子
![[开源邮箱] Cloudflare 邮箱服务 使用Vue3开发的响应式简约邮箱服务,支持邮件发送附件收发](https://blog.skymail.ink/images/getting-started/36.png)
设置转发到worker
![[开源邮箱] Cloudflare 邮箱服务 使用Vue3开发的响应式简约邮箱服务,支持邮件发送附件收发](https://blog.skymail.ink/images/getting-started/37.png)
![[开源邮箱] Cloudflare 邮箱服务 使用Vue3开发的响应式简约邮箱服务,支持邮件发送附件收发](https://blog.skymail.ink/images/getting-started/38.png)
设置完成的样子
![[开源邮箱] Cloudflare 邮箱服务 使用Vue3开发的响应式简约邮箱服务,支持邮件发送附件收发](https://blog.skymail.ink/images/getting-started/39.png)
测试接收邮件
![[开源邮箱] Cloudflare 邮箱服务 使用Vue3开发的响应式简约邮箱服务,支持邮件发送附件收发](https://blog.skymail.ink/images/getting-started/39-1.png)
6 附件收发
设置完这一步后才能接收附件和发送附件
回到上一级菜单,找到r2对象存储,创建存储桶
![[开源邮箱] Cloudflare 邮箱服务 使用Vue3开发的响应式简约邮箱服务,支持邮件发送附件收发](https://blog.skymail.ink/images/getting-started/40.png)
桶名字可以随便填 位置选择离你近的地方
![[开源邮箱] Cloudflare 邮箱服务 使用Vue3开发的响应式简约邮箱服务,支持邮件发送附件收发](https://blog.skymail.ink/images/getting-started/41.png)
设置自定义域名
![[开源邮箱] Cloudflare 邮箱服务 使用Vue3开发的响应式简约邮箱服务,支持邮件发送附件收发](https://blog.skymail.ink/images/getting-started/42.png)
![[开源邮箱] Cloudflare 邮箱服务 使用Vue3开发的响应式简约邮箱服务,支持邮件发送附件收发](https://blog.skymail.ink/images/getting-started/43.png)
自定义域名添加到项目设置里面,域名前要加https://
![[开源邮箱] Cloudflare 邮箱服务 使用Vue3开发的响应式简约邮箱服务,支持邮件发送附件收发](https://blog.skymail.ink/images/getting-started/44.png)
回到worker绑定刚才创建的r2存储桶
r2存储桶 变量名为 r2
![[开源邮箱] Cloudflare 邮箱服务 使用Vue3开发的响应式简约邮箱服务,支持邮件发送附件收发](https://blog.skymail.ink/images/getting-started/45.png)
7 邮件发送
使用第三方服务resend发送邮件
浏览器输入resend.com注册
![[开源邮箱] Cloudflare 邮箱服务 使用Vue3开发的响应式简约邮箱服务,支持邮件发送附件收发](https://blog.skymail.ink/images/getting-started/56.png)
添加域名
![[开源邮箱] Cloudflare 邮箱服务 使用Vue3开发的响应式简约邮箱服务,支持邮件发送附件收发](https://blog.skymail.ink/images/getting-started/57.png)
![[开源邮箱] Cloudflare 邮箱服务 使用Vue3开发的响应式简约邮箱服务,支持邮件发送附件收发](https://blog.skymail.ink/images/getting-started/58.png)
![[开源邮箱] Cloudflare 邮箱服务 使用Vue3开发的响应式简约邮箱服务,支持邮件发送附件收发](https://blog.skymail.ink/images/getting-started/59.png)
![[开源邮箱] Cloudflare 邮箱服务 使用Vue3开发的响应式简约邮箱服务,支持邮件发送附件收发](https://blog.skymail.ink/images/getting-started/60.png)
等待验证完成
![[开源邮箱] Cloudflare 邮箱服务 使用Vue3开发的响应式简约邮箱服务,支持邮件发送附件收发](https://blog.skymail.ink/images/getting-started/61.png)
验证完成后的样子
![[开源邮箱] Cloudflare 邮箱服务 使用Vue3开发的响应式简约邮箱服务,支持邮件发送附件收发](https://blog.skymail.ink/images/getting-started/62.png)
创建apiKey
![[开源邮箱] Cloudflare 邮箱服务 使用Vue3开发的响应式简约邮箱服务,支持邮件发送附件收发](https://blog.skymail.ink/images/getting-started/62-1.png)
![[开源邮箱] Cloudflare 邮箱服务 使用Vue3开发的响应式简约邮箱服务,支持邮件发送附件收发](https://blog.skymail.ink/images/getting-started/63.png)
![[开源邮箱] Cloudflare 邮箱服务 使用Vue3开发的响应式简约邮箱服务,支持邮件发送附件收发](https://blog.skymail.ink/images/getting-started/64.png)
回到项目网站设置
![[开源邮箱] Cloudflare 邮箱服务 使用Vue3开发的响应式简约邮箱服务,支持邮件发送附件收发](https://blog.skymail.ink/images/getting-started/64-1.png)
设置邮件状态回调接口
![[开源邮箱] Cloudflare 邮箱服务 使用Vue3开发的响应式简约邮箱服务,支持邮件发送附件收发](https://blog.skymail.ink/images/getting-started/65.png)
回调接口 https://你的域名/api/webhooks
![[开源邮箱] Cloudflare 邮箱服务 使用Vue3开发的响应式简约邮箱服务,支持邮件发送附件收发](https://blog.skymail.ink/images/getting-started/66.png)
![[开源邮箱] Cloudflare 邮箱服务 使用Vue3开发的响应式简约邮箱服务,支持邮件发送附件收发](https://blog.skymail.ink/images/getting-started/67.png)
8 人机验证
设置这一步后可以开启人机验证,防止网站被机器人批量注册
菜单栏找到 turnstile
![[开源邮箱] Cloudflare 邮箱服务 使用Vue3开发的响应式简约邮箱服务,支持邮件发送附件收发](https://blog.skymail.ink/images/getting-started/50.png)
![[开源邮箱] Cloudflare 邮箱服务 使用Vue3开发的响应式简约邮箱服务,支持邮件发送附件收发](https://blog.skymail.ink/images/getting-started/51.png)
添加你的域名
![[开源邮箱] Cloudflare 邮箱服务 使用Vue3开发的响应式简约邮箱服务,支持邮件发送附件收发](https://blog.skymail.ink/images/getting-started/52.png)
名字随意
![[开源邮箱] Cloudflare 邮箱服务 使用Vue3开发的响应式简约邮箱服务,支持邮件发送附件收发](https://blog.skymail.ink/images/getting-started/53.png)
复制这两个密钥
![[开源邮箱] Cloudflare 邮箱服务 使用Vue3开发的响应式简约邮箱服务,支持邮件发送附件收发](https://blog.skymail.ink/images/getting-started/54.png)
回到项目设置页面设置密钥
![[开源邮箱] Cloudflare 邮箱服务 使用Vue3开发的响应式简约邮箱服务,支持邮件发送附件收发](https://blog.skymail.ink/images/getting-started/55.png)
9 TG和其他邮箱转发
在TG搜索找到这个人
![[开源邮箱] Cloudflare 邮箱服务 使用Vue3开发的响应式简约邮箱服务,支持邮件发送附件收发](https://blog.skymail.ink/images/getting-started/69.png)
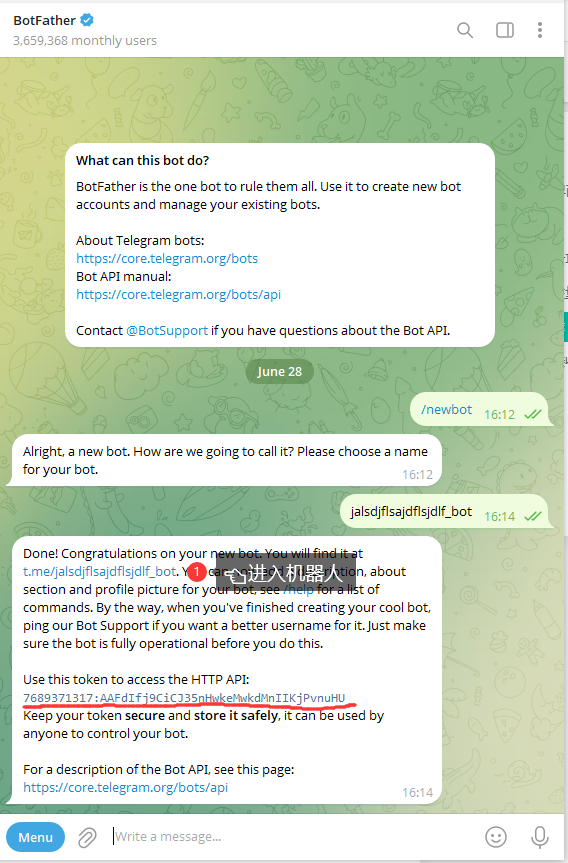
给机器人一条发消息
![[开源邮箱] Cloudflare 邮箱服务 使用Vue3开发的响应式简约邮箱服务,支持邮件发送附件收发](https://blog.skymail.ink/images/getting-started/70.png)
浏览器输入 https://api.telegram.org/bot你的机器TOKEN/getUpdates 获取chat_id
如果获取不到就再给机器人发几条消息
![[开源邮箱] Cloudflare 邮箱服务 使用Vue3开发的响应式简约邮箱服务,支持邮件发送附件收发](https://blog.skymail.ink/images/getting-started/74.png)
设置token 和 chat_id
![[开源邮箱] Cloudflare 邮箱服务 使用Vue3开发的响应式简约邮箱服务,支持邮件发送附件收发](https://blog.skymail.ink/images/getting-started/71.png)
转发到其他服务商邮箱
在cloudflare验证邮箱
![[开源邮箱] Cloudflare 邮箱服务 使用Vue3开发的响应式简约邮箱服务,支持邮件发送附件收发](https://blog.skymail.ink/images/getting-started/72.png)
设置邮箱
![[开源邮箱] Cloudflare 邮箱服务 使用Vue3开发的响应式简约邮箱服务,支持邮件发送附件收发](https://blog.skymail.ink/images/getting-started/73.png)
教程完结
项目更新教程
- 仓库代码更新后fork到你的仓库worker会自动重新部署,绑定的数据库 d1 kv r2 会掉,每次更新都要重新绑定 (目前没有更好的办法解决)
- 执行 https://你的项目域名/api/init/你的jwt_secret 更新数据库 (只会更新不会覆盖已有数据)
原创文章,作者:大掌柜,如若转载,请注明出处:https://www.4mf.top/web/6014.html